
Grade: Real grade (RG)
Scale: 1/144
Release date: 2010
Price: 2500 Yen
Price for me: 15,13 Eur model + 15 Eur shipping, together 30,15 Eur
This post is not finished, that means that i work on this model just now and during my progress i post here my thoughts, peace.
DAY 1 / 12.11.2015 (thursday)
PINK PRINCESS
So, i want to use this blog as a journal or some sort of ´´cute pink princess´´ diary for my Gunpla progress, works and throughts during my builds xD. At this point iam absolute beginner, so please keep patience with me. At first i want to apologize, my english is not good as i want to be, but i try my best.
As my first REAL GRADE kit i decide to buy this ZAKU II, actually it was a present from my lovely fiancee, which always stay with me no matter what, love you so much my love, thank your for everything and in this point for this amazing kit!
I want to apologize for photo quality, for building process I will use only my phone (LG G3), because it is easier to upload photos direct to my computer and then directly to this site. I think that for preview purposes its enough. When I finish build I take some photos with camera (NIKON 1 J1) and with some simple background xD
I want to apologize for photo quality, for building process I will use only my phone (LG G3), because it is easier to upload photos direct to my computer and then directly to this site. I think that for preview purposes its enough. When I finish build I take some photos with camera (NIKON 1 J1) and with some simple background xD
SHIPPING TO GERMANY / AMAZON,HLJ
So my fiancee made a order from HLJ.COM (Hobby Link Japan), we live in Germany and afrer some searching i figured out that in Germany i have no chance to buy any Gundam kit in the classic store. But off course i have possibilities to buy kits online. The easiest way to buy Gunpla in Germany is of course Amazon.de, they have plenty of kits, but not everything, price is usually fair or a little bit higher, but when i make comparison with for example HLJ.com then it will come out about the same. For example: Amazon.de sell RG ZAKU II for 20Eur with shipping, but we must wait 25-30 days for package, which is too much when u want your Gundam asap xD. In the other hand HLJ.com sell RG ZAKU II for 2000yen (cca 15Eur), which is very nice, but price is without shipping. In this case you can choose between Standard (10-30 days / 8Eur) or Express (2-7 days / 14Eur) shipping. It's up to you if you need package fast and of couse pay a little bit more or you have time and spend some cash for another things.
Summary:
HLJ.com kit: 15,13 Eur / Shipping: Standard 8Eur. Express 15Eur / Delivery time: Standard 10-30 days, Express 2-7 days. Together: Standard shipping 23,13Eur, express 30,13Eur
Amazon.de kit: 19,10 Eur / Shipping: Free / Delivery time: 20-30 days

And of course we cant forget to border controll (Ger: Zollamtlich abgefertigt). You must count with another time extra, and sometimes you must pay some cash more for imposition / toll (cca 20% of package price), which is always terrible.
So, i wait 8 work days and my Package finally came. At this case my fiancee bought ZAKU from HLJ.com with Express shipping, i think that border controll added some time more, cca we must count 1-2 days more. But Gunpla worth it xD

Unfortunately I had an accident at work, my back just stopped working, maybe I forgot to implement some parts, It seemed strange to me that my runners left many parts xD Heh, anyway when I returned from doctor this package with lovely Logo wait for me on the stairs and my mood immediately returned xD I must say that HLJ made excellent job with packaging, when i made unboxing i had smile at my face. Zaku came to me at excellent form, thank you HLJ !
FIRST GUNPLA, HARD CHOISE
I must say, that is very hard to decide which kit you choose for first time, you have many grades, many gundam series, types and so on. I must say that i saw many youtube videos and read many artickles, but this Youtube video "What kit should I buy?" from Zaku Aurelius tell you everything, btw definitely check his profile, good things! As ZakuAurelius said: Just buy whatever kit looks good to you xD So i decide to buy this Real Grade ZAKU II, before i decide to gunpla modelling i made Origami and I always want more details on my models, this is why i decide this grade: small size, more details, as front title on box says: the real thing xD And why ZAKU ? Because he is pink, ehm just like the design, weapon choise and pipes xD
FINALLY UNBOXING, WHUAAAA !!!
Lets make some unboxing, box is very shinyyyy, like the box art, zaku looks like BadAss. In right upper corner we can see logo of Real Grade, scale 1/144 and some logo of Gunpla 30th Anniversary. In the lower part of front box is description what RG is.

Bottom part shows main aspect of Real Grade: inner frame and some another features like, mini pipe parts, stickers and articulation.

Upper part is savage, shows different poses, moveable parts in detail, types of plastic used in this model, and of course price, which is in this case 2500 Yen.

Left and Right side of the box show us logo of real grade, name of Gunpla model and number 02, which is model number in series.

In the box we have 6 plastic foil sheed in which we have 9 runners, stickers and two tiny little springs, which are definitelly cute xD. When i first time saw runners i was like what?!, the number of pieces are awersome, but what is more important the level of details is autstanding. Runners have different colours and different types of plastic. I also saw runner which contains four colours, omg! At first i will show you manual, which have marvelous mubmer of pages: 20 xD


Lets take a closer look at the runners. We have 9 runners for this kit, which they have a awersome colour separation. Four different colours of ´´pink´´ one red ond two grey colours.

BAG 1 / RUNNER A: When we open box for first time, first thing you can see is this runner, and i can say that this runner is something extraordinary. Just because this runner contains four fifferent types of colours: pink, dark red, red and four clear parts probably for head unit. Bandai must make good job with engineering this types of runners. In first plastic bag are also stickers, which are really tiny, they improve look of my Zaku for sure xD

BAG 2 / RUNNERS C,G1: Two runners of light pink colour, contains armor parts like shoulders and tiny round pieces. Anyway kit is from year 2010, this information is on every runner, another informations are: grade and name of runner, for this runner it is G1 and C.

BAG 3 / RUNNERS D, H: Both of this runners are dark grey, they have some weapon parts, foot parts and another parts which i have no idea what they are xD.

BAG 4 / RUNNER B: Name of this runner is Advanced MS Joint 2, and this runner is that, what make real grade real grade. In this runner we already have moveable parts melted together in one piece, again unbelievable, great job Bandai! We can name this runner as main inner frame a.k.a. sceleton of our gunpla.

BAG 5 / RUNNERS E, G2: I can name this runners Megalo-runners xD In comparision with another runners, these are really big. Runner E have light grey colour and have some weapon parts, such as frame parts. Runner G2 have light pink colour and contains with some outer armor parts.

BAG 6 / RUNNER F1: Ok, this runner is something special, have some left and right outer armor parts, head parts, spikes and many little round parts for zakus tubes. Bag also have two little metal springs for tubes in foot in yellow bag, l l l l Like it xD
DAY 2 / 13.11.2015 (Friday)

So, we have unboxing behind, now i touch runners, parts and manual, cant wait for assembly this little beast xD Yesterday i had too much pain in the back, so i could not work on this project. I try to make some little progress today. At first i must say that iam extra slow with assembling and removing nub marks. Iam perfectionist and every little detail is important to me.

At first i separated runners from plastic bag and prepared tools for simply assembling. Tools i use:
- Some sort of sharp Hobby knife, just now i use just regular type, but later i want to buy Tamiya modellers knife, i heard about this knife only good things.
- Fine detail cutters, i use cutters from Citadel, they are pretty sharp, easy to use, looks savage, but reasonably a little bit more expensive, maybe later i also by cutters from Tamiya.
- Abrasives to remove nub marks, i have set from Tamiya, (surface roughness p400, p600 and p1000) and recently i bought nails file with four surfaces in drogerie, funny but maybe it works.
- Cutting mat, very important thing.

I divided runners in alphabetical order (its easy to find parts in specific runners, when we have runners in order) and put back to our box, now we have order with all of different parts.
ASSEMBLING
Ou right, after all this informations lets go to assembly this pink princess xD. Manual tell us, that first part for assembling is ankle unit. In addition manual show us which runners we must use for different parts of body, anyway nice addition in comparison with HG (High grade).
01 ANKLE UNIT

I cut off first part from Runner B, which is Advanced MS Joint, and in this point i just must say wow! Three fifferent parts of plastic already snaped together with various shades of grey ? Totally impressed! Level of detail is awersome and different shades of grey looks fantastic! Only this part contain two joints for improved articulation of ankles. (picture below)

All parts snaps together very easily, color diveristy works to me very well, we can see lines for panel lining nor only on pink parts but also on grey parts, love details!

Lower part of ankle unit is very nice, i like middle point a lot.

One ankle unit contains 9 parts with three different colours, one pink and two different grey. On the left side of the picture are all parts which we need for ankle unit and on the right side we have completed ankle.

When i must make two same parts simultaneously i usually use some sort of small container for storage. It is good, because when we have too much small parts its a high probability to loose little tiny parts.

And just another picture of completed ankle units, soo cute xD

02 RIGHT LEG
In this time i had too much pain in my back and I couldnt continue at my work table, so i moved to bed, and continued my project there xD. Next part is very interesting, manual tell us which parts we must cut off on advanced MS joint runner, its better to look twice before we start cutting. We have some plastic between inner parts too, so be careful.

At another picture is how look inner frame right leg unit cuted from runner. Again, iam so impressed with different colour variation and level of detail !

This unit is awersome ! When we move one unit, another unit move independently from another parts. This is not HG for sure. Motional possibilities are great.

This unit need little more assembling and a little twisting of some parts. Completed Joint look like that:

Next step is to join some grey parts fo our inner MS Joint, lets do this!

DAY 3 / 14.11.2015 (Saturday)
Doday i have all day free so i can work on my RG Zaku. So at first i added two little tiny silver rounded stickers (you can find this sticker around middle pink circle) directly on Joint, this little upgrates make zaku looks savage xD. After that I added some light grey inner frame parts and i must say with every one little piece looks foot better and better. And finally my favourite colour pink! xD

After some grey inner parts and some pink armor look foot like this.

Look at this tiny little jet parts! Remove rub marks from this is really challenge xD

This part of inner armor with completed jet parts look fantastic, love jet parts on armor.

There is nothing to say about this picture, look at little gaps for panel lining, omg !

I added some another pink parts, color variation is seen, like 3D shape of jet parts.

Some light grey inner parts, pink outer armor and some dark grey outer armor completely added xD
Second picture show flexibility of this incredible real grade foot, which is almost 180 degrees, nice.


This side of leg contain two holes, why we have two holes at one leg ? xD

Its time for some metal springs and some baby pink necklace parts, or ?

Two main dark grey parts hold metal spring pretty strong, now its time to add some pink neckackle parts for pink princess xD

Looks nice, where is princess now ? xD

And there he is, completed right leg with spring and ankle unit, love the look of this. Definitelly something extraordinary for me. Color separation is seen, make a big difference. Completed leg is pretty stable, thanks big ankle unit.

As we can see on the another picture, knee armor and thigh armor part move independently from another parts, which is for something in this size amazing ! Metal spring of course move with movement too, is surprisingly very solid. I must say that one more time, love the design of this beast!

DAY 4 / 15.11.2015 (Sunday)
Such a cloudy day today, what man can do at the day like this, of course gunpla modelling xD At the beginning of the day I said myself, ok today i definitely made more than another foot, now i know how to build it, another foot will be child's play, sadly look.
03 LEFT LEG
I decide to make this picture, just some look at difference between full amored foot and inner frame parts.

DAY 5 / 16.11.2015 (Monday)
Finally I was able to complete both of legs, look at this shiny armor.

04 WAIST UNIT
After two same legs, waist was a little diversify. Build began with one big part from runner B, which is advanced MS joint a.k.a. inner frame.

Manual say that we must separate big part to three different parts, while we really need only two of them, one part is only a rest of runner.

And what we have here ? Finally another colours, hell yeah xD Waist is a BadAss xD

Fully assebled half part of Waist unit looks like that. Like the details and colour diversity of new colours.

DAY 6 / 17.11.2015 (Tuesday)
Today is sad day for me and especially for my fiancee, unfortunately one of my fiancee´s rabbit passed away, he fought for something like síx days, unfortunately he can not handle it anymore, so definitely one of these sad days. Such a things are part of life, I did not do a lot, but anyway want to share progress with you guys. I begun with another inner frame MS Joint Runner, some nubs cleaning and wuala, second part of inner frame waist unit was born xD.

After adding two back parts of side armor waist unit is goint to be nearly complete.

Completed all three parts of waist unit looks like this. We must add one more part from previous MS joint disconnection.

Completed waist unit looks amazing, color separation is even more seen. Front parts dont hold very secure and sometimes drops, but another parts holds quite well.

Another picture show artilucation of waist unit, how far we can move individual parts. Rear part contain small moveable part for i think Zaku bazooka.

Just waist unit with both of legs, it seems to me like Spartain look now xD

05 RIGHT ARM
Cant wait for assembling exactly this arm, i like look of shoulder unit, looks to me like another shield, pretty savage look xD Build start with cutting off right inner frame part from Advanced MS Joint runner, then removing some useless pieces of plastic (nubs and spheres) and then disassembling to five single parts. Lowest part is also useless, so we can use Zakus bazooka to blow up this piece xD

We continue with largest part, which this part need some assembling according to instructions.

Next step is connecting this four pieces together. I also added some light grey parts to inner frame. The entire leg unit looks to me like a tiny little piece of something in comparison with leg unit xD Like the dark color of inner shoulder part, darknesss xD

And here we have completed step from previous picure, looks pretty nice. Now need to add some tiny pink outer armor parts. And I have enough for today, I must say, i really enjoy to build this RG Zaku and every piece is a new discovery.

DAY 7 / 18.11.2015 (Wednesday)
Me and my lovely financee have free day today, love days like this, do nothing, just relaxing and only take care about each other and of course our hobbies xD. However back to Zaku, after adding previous parts i recognize that one part of triceps is moveable, with something this small I did not expect moveable part. Again, nice addition, we have here another elbow pink parts and albow itself with dark grey colour.

Now we must implement some rounded light pink parts and one grey part for very bottom part of forearm, which is free, I mean not hold position firmly. For first time i think that i forgot at something in manual xD

One more hand assembling and our hand is nearly complete. We have also one special hand with articulation more, but about that later. This closed hand is enough for yet.

Hand looks pretty nice, like the colour separation. Dont mess with Zaku when you already saw his fists xD
Lets build shoulder armor or plate, or shield, or ... ahh ... never mind xD At first we need some sord of holder, which consists with this four little tiny parts, hard times with these xD Shoulder armor is moveable so thats why this one is a little complicated.

Assembled shoulder armor holder looks like this tiny part on the right xD Shoulder armor itself consists of three colour different parts, actually this is for first time that i recognized something in this size xD Biiiigggg xD

Completed shoulder armor with holder and hand itself look really nice. The overall look should not to be ashamed xD

Just another point of view to shoulder armor from the inside. Two colour separation of pink color can be seen. We can also see movement possibility of shoulder armor.

07 BODY UNIT
Iam sorry for that, but i decide in contrast to making another arm, make body unit at first. And make another arm later xD. After cleaning Advanced MS Joint body part by all unnecessary plastic nubs I prepared two another grey parts. Left piece is cocpit interior and piece on right side is a seat. I came to this later xD. Advanced MS Joint body part have four joints, two for hands, one for head and one for connection to waist unit. In the middle we have one big joint for some addition articulation of torso.

After implementing two previous parts, we must also add two tiny little split parts. These parts are from Advanced MS Arm Joint, which we previously distributed ( 05 Right arm, 06 Left arm). These parts include double joint for better arm performance. Grey part in the right looks pretty savage xD Little part on the left are actually cocpit doors.

Two andvanced MS joint arm parts need a little assembly. Inner torso frame looks safe xD One big pink back plate more for handling a backpack xD

Now me must join lower part of torso, which consists with two tiny light pink parts and one big dark red torso part. This part will allow us some addition movement of torso.

Some grey parts for front armor and place uppermost of torso. This parts makes some really good separation feeling.

Torso almost complete, only for show purpose i left cocpit opened. Now me must add two dark red parts at the sides and two little tiny light pink parts for front tubes holding.

Ok, I had to make this picture! Look at this tiny front armor parts, my hands got a hard time here. I almost got a cramp xD.

And here we have all parts for backpack, jets are moveable, which I kindly like xD And what we have here ? Red part, ou yea, only one red piece of this kit xD.

DAY 8 / 19.11.2015 (Thursday)
Home alone, nothing to say more, lets go assembling some gunpla xD From previous day we have some rest part, which when we snaped together we got this awersome looking backpack with decent color separation and moveable jet parts. Cool xD...ehm...or hot ?

Two parts more for front tubes holder, this small parts makes a big difference between new and previous front look.

Its tubes time baby! Actually dark strange looking part on the right is kinda tricky. Twisted parts have lightly differend shape for easier pink rings flow. One side is thicker than another for pink rings obstruction.

After adding some pink rings, tube looks like on the picture below. Again hard times with nub removing and cleaning this tiny rounded parts.

Destructiooon ... ehm ... we must remove excess part, strictly according to instructions xD

Lovely looking torso with some really nice tube parts effect. Color separation is seen, whole torso had his own style.

DAY 9 / 20.11.2015 (Friday)
Friday baby, time for some relax and of course for some gunpla building xD Unfortunately I did not have too much time for my hobby, because at first I had to settled some personal things. But after that I was fully dipped into xD.
06 LEFT ARM
I was able to made only left arm and shoulder. Arm is the same as we saw before. But shoulder is unique, presonally like this type of shoulder too much. Seems to me like shoulder from World of Warcraft, spikes, dangerous things xD Anyway, three spikes and two parts with different colours.
Productive friday xD

And here we have arm completed with left arm and connecting part, completely same as previous one.

DAY 10 / 21.11.2015 (Saturday)
Two legs, torso, two hands, what more we need ? Anyway, its Saturday and I must say i sleep too long today, and when I say too long, i mean loooong xD I cant leave my Zaku without Head unit anymore xD
08 HEAD UNIT
So lets build this savage lookig head ! Four strange looking parts, different shapes with different sizes, needs some really precious work with nubs removing.

Ok, we make now vacuum cleaner, ehm xD. Two parts more with dark grey colour. We must connect this two parts together and then rotate, wuala we have neck now.

Monoeye time, one clear part, one little dark grey part with gearwheel system and of course pink sticker for eye.

Two special parts more. Its a little delicate to remove nubs from clear plastic correctly, but with little patient its really no problem. I also clean inner part of clear plastic, before we put all parts together. Then we have no fingerprints at inner clean part. All parts go together easily and with no problems.

Head looks already very stylish, some small pink circle parts more, one purposefully modeled grey pipe and we have one side finished.

I made this picture because at firstly i want to show pipe with circle parts, remaining plastic we can cut, with a clear conscience xD. And most importantly secondly the monoeye xD Mechanism will allow us to move eye automatically during head rotation. Great invention xD The interior of head contain gear with gear wheels, how we have in the clocks.

And here we have two tiny pink parts more. First part is for keeping tubes at the back of the head unit securely. And second part is our favorite piece: commander antena xD Sorry i really dont know right name for this piece xD

DAY 11 / 22.11.2015 (Sunday)
It looks like that we have all body parts finished. I really cant wait for weapons assembly. Outside is too cold today and after short walk with my lovely Fiancee Iam ready for this challenge.
09 WEAPONS - ZAKU MACHINEGUN
Lets build this legendary weapon. I loose photo of first three parts, but assembled pieces looks like object on the left side. We have also two small light grey parts, first is hand handle and another tiny part is for secure handling. This type of handling uses second hand type. I will write about this hand type later, but there are cool xD

Nice shaped front parts with one clear part for lens effect. I like the direction of this assembly goes in. Color separation is seen.

Magazine (ammo bag) consist with two rounded parts and together with weapon looks amazing. Completed Zaku machinegun looks awersome, at first i was like ... ahhh ... i dont know ... but now ... probably the best weapon in this kit! We also can put magazine down and attach it to the back or side of waist unit, but i prefer this look.

Just another view, at this angle we see lens shape and front position of handle. Also folded tiny part for secure hand handling.

10 WEAPONS - ZAKU BAZOOKA
When i heart word Bazooka i instantly remember to game Worms Armagedon with classic shout - Bazooka xD. Ehm, anyway, first three parts, one most likely the biggest part of this kit with dark grey colour, special thing on this part is, that we have already molded rounded piece with all details like holes. We also have two light grey parts for holding whole weapon and for lens holding.

Time for lens, one little light grey part for secure hand handling, dark grey optics and one clean rounded part for lens itself. I wash this clean part a little more as I was, but i stuck this with little bit of glue.

Here we have one light grey handle for another hand and dark grey ending of bazooka, very stylish xD

Bazooka is finished ! Great and very stylish look, like the possibility of lens and handling movement. You can easy twist this parts to satisfying position. Bada Boooom xD

11 WEAPONS - HEAT HAWK
Zakus Tomahawk contains only with two parts, light and dark grey colours. Parts easily snap together, and this weapon looks just nice, not really my style, but as a addition its good.

Snapped together looks like on the picture, i must mention one little part too, this small part is for attaching hawk to sides or back of waist unit. Scalp time baby xD

12 RIGHT AND LEFT HANDS
Both of this high articulated MS Joints hands are in this form can be founded in the MS Advanced Joint runner. After some soft nub marks removing, some assembling according to instructions, we get some really looking hands with awersome articulation in this size.

Of course we must join one more important part, pink hand armor part. One more time, hand have some very nice articulation with two joints for each finger, while we have finger, forefinger and three fingers molted together. We obtain pair of decent hand, both with holes for weapons with secure handling.

I made this picture for comparison purposes with old fist-hands. Except of complete another articulation, both of hands have another shape of pink armor part. I like articulated armor more xD

UPDATE - DAY 12 / 25.11.2015 (Wednesday)
I made it, so proud to myself xD All parts are completed. After assembling I want to make a little review of every part of armor individually and then some better quality photos of snap building. In the future i want to buy some panel lining stuff and just make my kit looks better. After that I would like to apply all stickers and enjoy my kit. Just now have some hard time in my work, I still have much pain in my back, so at this time I try to find some new information about gundams, kits, weathering, panel lining, etc. and let my back rest a little xD
UPDATE - 2 MONTS AFTER, PANEL-LINING TIME / 28.01.2016
After spending some time with gundams, after some RG and HG builds and after purchasing some another stuffs I was able to finish panel-lining with my Tamiya Panel Line Accent Colour. Review HERE. I will combine next pictures of panel-lining with review of each part of body individually xD I used for Panel-Lining Dark Brown colour.
FOOT UNIT
Simple stuff here, everything works pretty well, front part moves a little, back part a little more, some nice details, pretty good foot unit with bulky design xD Later i will paint details on the bottom of the feet, they are very nice!

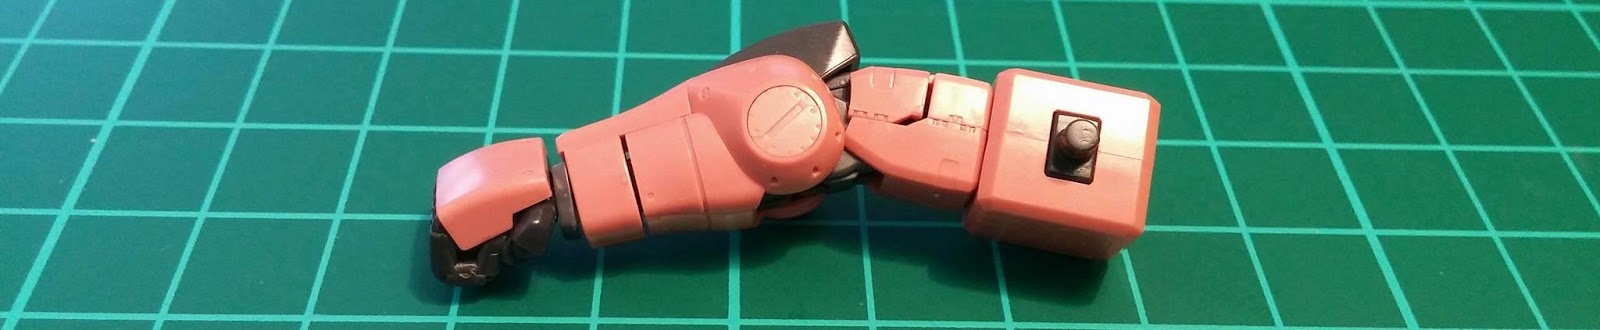
LEG UNIT
Probably the most complicated part of whole kit and off course the most detailed. Articulation and level of details on this foot is awersome, everything move quite nice, knee armor moves separately, nice hip-knee rounded armor details, nice colour separation, kinda bulky-design and also nice pipes on the back. Like the trusters, later when I buy some paints I will paint them for sure xD

WAIST UNIT
The most disappointment for me was this Waist unit. Lower ball joint is too weak and popps-out everytime when he have opportunity. Back and front waist armors are kinda too tight and poops-out pretty usually too. One nice feature is moveable bazooka-holder on the back. When I panel-lined the front waist armor I broke part apart, I will have to buy Tamiya cemment xD

BODY and BACKPACK UNITS

ARM UNIT

RIGHT SHOULDER UNIT

LEFT SHOULDER UNIT

HEAD UNIT

AFTER PANEL-LINING


No comments:
Post a Comment